簡易Layout繪製教學
這篇文章主要是記錄自己寫的簡易的layout產生器的一些語法,透過一個簡單的work來學習SVG向量圖的語法
SVG 簡介
根據維基百科的敘述SVG是可縮放向量圖形(Scalable Vector Graphics,SVG)的縮寫是一種基於可延伸標記式語言(XML),用於描述二維向量圖形的圖形格式。SVG由W3C制定,是一個開放標準。基本上Linux內建的圖片瀏覽器可以直接開啟Chrome, Firefox也有插件可以使用, windows作業系統上也有程式可以開啟由於筆者主要作業環境為Linux這邊就不贅述其他作業系統的開啟方法。
個人常用語法簡介
跟html蠻像的都是用<> </>框起來的語法
以下為我檔案開頭的定義
1 2 3 4 5 6 7 8
| <svg xmlns="http://www.w3.org/2000/svg" width="350000" height="150000"> //定義圖檔可顯示高跟寬,超過會被截掉 <marker xmlns="http://www.w3.org/2000/svg" id="lineEnd" viewBox="0 0 10 10" refX="5" refY="5" markerUnits="strokeWidth" markerWidth="4" markerHeight="3" orient="auto"> //自訂圖案的起點終點等邊框相關,不過我不常用相關用法可見註解1 <rect x="0" y="0" width="10" height="10" fill="red" /> </marker>
|
定義line
1 2 3 4 5 6 7 8 9
| <line x1="0" y1="0" x2="3200" y2="0" style="stroke:black; stroke-width:3;stroke-opacity:1" /> /* x1,y1,x2,y2代表著線的起點座標跟終點座標 style=" " 雙引號內的參數用來定義線的屬性 stroke:blac; 定義顏色 stroke-width:3; 定義線寬 stroke-opacity: 1是定義透明度0是完全透明1是不透明,可以填入0~1的浮點數 */
|
定義rectangle
1 2 3 4 5 6 7 8
| <rect x="0" y="0" width="350000" height="150000" style="fill:white;stroke:black;stroke-width:1; fill-opacity:0;stroke-opacity:0.6" /> /* x,y表中點座標 width,height 表長方形之長寬 stroke-width:1 表長方形之邊框長度 fill-opacity:0;stroke-opacity:0.6 表透明度 */
|
定義circle
1 2 3 4 5 6 7 8
| <circle cx="2200" cy="2200" r="20" style="fill:blue;stroke:blue;stroke-width:3; fill-opacity:1.0;stroke-opacity:1.0" /> /* fill:blue; 填滿藍色 stroke:blue; 邊框藍色 fill-opacity:1.0; 填滿顏色之透明度為1 stroke-opacity:1.0" 邊框透明度為1 */
|
定義text
1 2 3 4 5 6 7 8 9 10
| <text x="1030" y="2240" style=" stroke:black; fill:green; font-size:100px;">1</text> /* x,y 定義文字座標 style內定義文字屬性 stroke 定義邊框顏色 fill 定義文字顏色 font-size 定義文字大小 <> </> 中間為定義文字內容 */
|
Example
以博士班學長李建德之”抗干擾之紙基數位微流體生物晶片繞線器”的benchmark為範例做一個簡單的應用教學
愈會製Layout如下
 1
1
以下將分多個步驟依序完成此layout
step1 繪製框線
透過line語法將框線畫出,為了方便辨識我們將非整數的線條透明度條成0.4
範例如下
1 2 3 4 5 6 7 8 9 10
| <line x1="0" y1="0" x2="3200" y2="0" style="stroke:black;stroke-width:3;stroke-opacity:1" /> <line x1="0" y1="100" x2="3200" y2="100" style="stroke:black;stroke-width:3;stroke-opacity:0.4" /> <line x1="0" y1="200" x2="3200" y2="200" style="stroke:black;stroke-width:3;stroke-opacity:0.4" /> <line x1="0" y1="300" x2="3200" y2="300" style="stroke:black;stroke-width:3;stroke-opacity:0.4" /> <line x1="0" y1="400" x2="3200" y2="400" style="stroke:black;stroke-width:3;stroke-opacity:1" /> <line x1="0" y1="500" x2="3200" y2="500" style="stroke:black;stroke-width:3;stroke-opacity:0.4" /> <line x1="0" y1="600" x2="3200" y2="600" style="stroke:black;stroke-width:3;stroke-opacity:0.4" /> <line x1="0" y1="700" x2="3200" y2="700" style="stroke:black;stroke-width:3;stroke-opacity:0.4" /> <line x1="0" y1="800" x2="3200" y2="800" style="stroke:black;stroke-width:3;stroke-opacity:1" /> //運用迴圈將語法輸入到檔案裡~
|
就會產生如下框線
 Figure.1
step2 繪製Rout之線
同樣的我們使用line來定義走現只不過我們把顏色改成鮮豔的紅色,同時加寬的寬度。
範例如下
1 2 3 4 5 6
| <line x1="3000" y1="1800" x2="3000" y2="1400" style="stroke:red;stroke-width:10;stroke-opacity:1" /> <line x1="2200" y1="1800" x2="3000" y2="1800" style="stroke:red;stroke-width:10;stroke-opacity:1" /> <line x1="1000" y1="2200" x2="2000" y2="2200" style="stroke:red;stroke-width:10;stroke-opacity:1" /> <line x1="2000" y1="2200" x2="2000" y2="1800" style="stroke:red;stroke-width:10;stroke-opacity:1" /> <line x1="2000" y1="1800" x2="2200" y2="1800" style="stroke:red;stroke-width:10;stroke-opacity:1" /> //同樣也適用迴圈將其輸出
|
就會產生如下走線
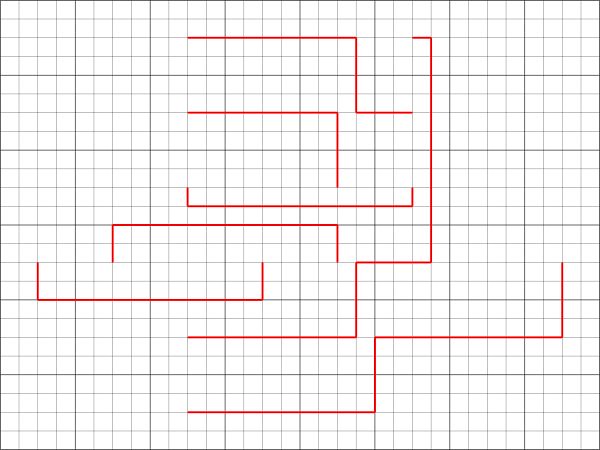 Figure.2
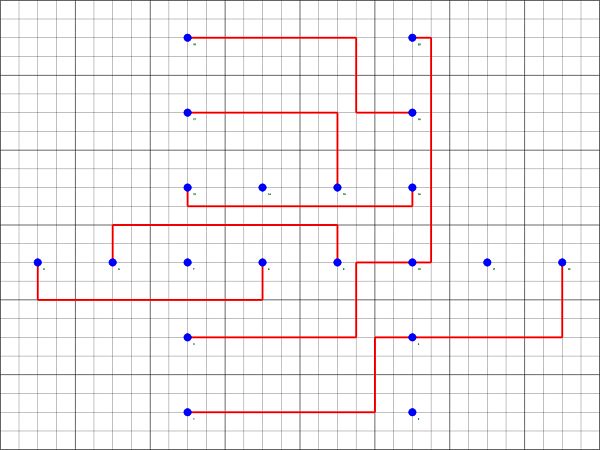
step3 加上起點終點和編號
透過前面的circle 和 text加上我們要的資訊
範例如下
1 2 3 4 5 6 7 8 9 10
| <circle cx="1000" cy="2200" r="20" style="fill:blue;stroke:blue;stroke-width:3;fill-opacity:1.0;stroke-opacity:1.0" /> <text x="1030" y="2240" style=" stroke:black; fill:green; font-size:100px;">1</text> <circle cx="2200" cy="2200" r="20" style="fill:blue;stroke:blue;stroke-width:3;fill-opacity:1.0;stroke-opacity:1.0" /> <text x="2230" y="2240" style=" stroke:black; fill:green; font-size:100px;">2</text> <circle cx="1000" cy="1800" r="20" style="fill:blue;stroke:blue;stroke-width:3;fill-opacity:1.0;stroke-opacity:1.0" /> <text x="1030" y="1840" style=" stroke:black; fill:green; font-size:100px;">3</text> <circle cx="2200" cy="1800" r="20" style="fill:blue;stroke:blue;stroke-width:3;fill-opacity:1.0;stroke-opacity:1.0" /> <text x="2230" y="1840" style=" stroke:black; fill:green; font-size:100px;">4</text> <circle cx="200" cy="1400" r="20" style="fill:blue;stroke:blue;stroke-width:3;fill-opacity:1.0;stroke-opacity:1.0" /> <text x="230" y="1440" style=" stroke:black; fill:green; font-size:100px;">5</text>
|
成品如下
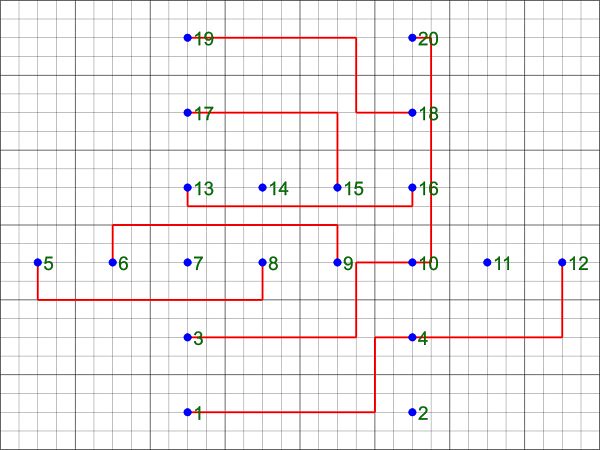 Figure.3
教學網站分享
1.SVG Tutorial by jenkov
2.SVG 完整教學 31 天 by oxxo
註解
1. SVG 研究之路 (17) - Stroke-marker
⬅️ Go back